


From Design to Stitch: The Role of Professional Embroidery Digitizers
Discover how professional embroidery digitizers transform designs into flawless stitched creations. Learn about their process, skills, and why they're essential for quality embroidery
Introduction
Ever wonder how intricate logos or detailed artwork become perfect embroidered pieces? The secret lies in the hands of professional embroidery digitizersthe unsung heroes who bridge the gap between digital designs and physical stitches. These specialized artisans possess skills that go far beyond simple image conversion.
Professional embroidery digitizers don't just convert images; they interpret and optimize designs for the unique language of embroidery machines. Their expertise transforms flat graphics into dimensional stitched art while accounting for fabric types, thread behavior, and machine limitations.
In this guide, we'll pull back the curtain on the world of professional embroidery digitizers, exploring exactly what these specialists do, why their work matters more than ever in our digital age, and when you should consider hiring one rather than attempting DIY digitizing.
What Does an Embroidery Digitizer Actually Do?
Professional digitizers are like translators for embroidery machines. They take standard image files (like JPEGs or PNGs) and convert them into specialized stitch files that machines can read. But their job goes far beyond simple file conversion:
Key Responsibilities:
-
Analyze designsfor stitchability
-
Determine optimal stitch types(fill, satin, running)
-
Program thread color changes
-
Adjust for fabric types(stretch denim vs. stiff canvas)
-
Add stabilizing underlay stitches
-
Test and refinedesigns before production
Unlike auto-digitizing software, professionals make hundreds of micro-decisions to ensure the design stitches out perfectly every time.
The Digitizing Process Step-by-Step
1. Design Evaluation
Digitizers first assess whether a design will translate well to stitches. They look for:
? Clear, high-contrast elements
? Appropriate level of detail
? Color separation possibilities
Common red flags include:
? Watercolor-style gradients
? Tiny text (under inch)
? Overly complex photographic details
2. Stitch Mapping
Using specialized software (like Wilcom or Pulse), they:
-
Trace key design elements
-
Assign stitch types to different areas
-
Set stitch directions (critical for texture)
-
Program pull compensation (prevents distortion)
3. Underlay Creation
Before the visible stitches, digitizers add hidden foundation layers that:
-
Stabilize the fabric
-
Prevent puckering
-
Help top stitches lay smoothly
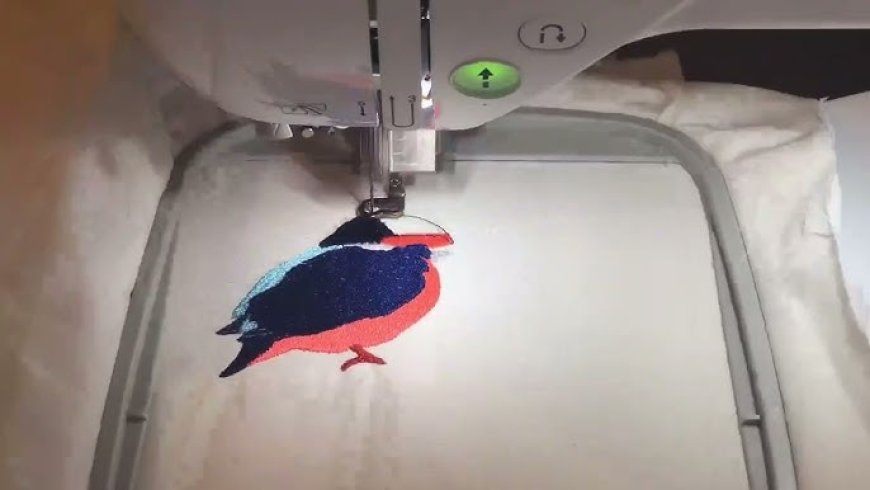
4. Stitch Testing & Refinement
Professionals always stitch out samples to check for:
-
Thread tension issues
-
Fabric distortion
-
Color blending problems
-
Any missed details
Why Professional Digitizing Beats DIY
| Factor | DIY Software | Professional Digitizer |
|---|---|---|
| Accuracy | Often misses details | Precise stitch placement |
| Fabric Adaptation | Generic settings | Customized for material |
| Stitch Efficiency | Wastes thread | Optimized pathing |
| Error Rate | High (requires multiple tests) | Minimal (right the first time) |
| Complex Designs | Struggles with details | Handles intricate work |
Real-World Example:
A company logo with small text might stitch out as a blurry mess with auto-digitizing, while a professional would:
-
Outline letters with satin stitches
-
Add stabilizing underlay
-
Adjust density for readability
When You Absolutely Need a Professional
Certain projects demand expert digitizing:
1. Corporate Branding
-
Logos with specific color matches
-
Tiny registration marks
-
Consistent replication across items
2. Photorealistic Portraits
-
Converting skin tones to thread blends
-
Mapping stitch directions for facial contours
-
Balancing detail with stitchability
3. Specialty Fabrics
-
Stretchy athletic wear
-
Delicate silks
-
Thick materials like leather
4. Large Production Runs
Where every second of machine time counts, optimized digitizing saves hours.
The Hidden Costs of Poor Digitizing
Skimping on digitizing often leads to:
1. Wasted Materials
-
Ruined garments from puckering
-
Excessive thread use from inefficient paths
2. Time Loss
-
Multiple test runs
-
Manual fixes during production
3. Brand Damage
-
Sloppy embroidery on customer products
-
Inconsistent logo reproduction
A $30 digitizing fee often saves $300 in wasted production costs.
How to Work With a Digitizer
Provide These Essentials:
-
High-quality artwork(vector files preferred)
-
Intended fabric type
-
Size specifications
-
Color codes(PMS or thread charts)
-
Usage context(hats vs. polos stitch differently)
Ask These Questions:
-
What's your experience with similar designs?
-
Do you provide test stitches?
-
What's your revision policy?
-
Can you optimize for reduced stitch count?
The Future of Digitizing
Emerging technologies are changing the field:
1. AI-Assisted Digitizing
-
Automates basic conversions
-
Still requires human refinement
2. 3D Stitch Simulation
-
Preview designs without test stitches
-
Adjust virtually before production
3. Cloud Collaboration
-
Real-time design tweaks
-
Instant feedback loops
Yet even with tech advances, the human eye for detail remains irreplaceable for premium results.
Conclusion
Professional embroidery digitizers are the crucial link between your vision and flawless stitched reality. Their expertise turns good designs into exceptional embroidered pieces while saving time, materials, and frustration.
While DIY options exist for simple projects, complex or commercial work benefits tremendously from professional digitizing. The small upfront investment pays dividends in quality and consistencyespecially for branding or production runs.
Next time you admire perfect embroidery, remember: behind every great stitch is a skilled digitizer who made it possible.